
We – you and I, all of us – have all been called to be the salt of the earth. We don’t look the same, think the same or act the same. We have different interests, different passions, different histories and backstories that have made us who we are.
Read MoreSemester of Science: The Human Body Part 3
You made it to round three! I'm so happy! This one will be awesome. You'll see. Today's post is going to complete our Human Body series. I will continue by giving you even more hands on science experiments to do with your kids. So, put on your goggles and lab coat and let's get started.
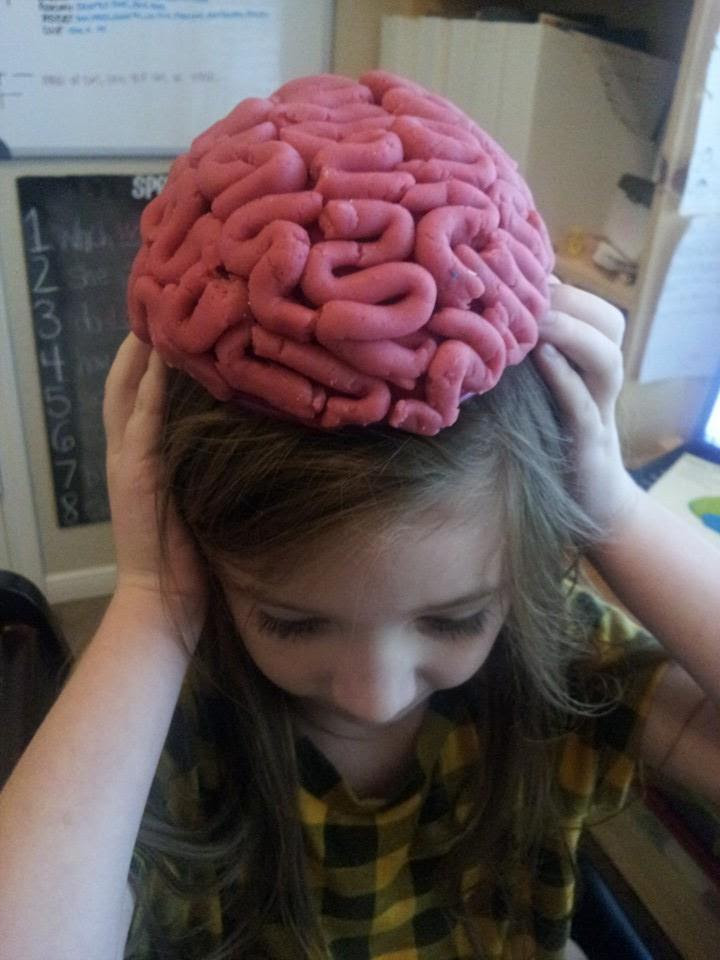

This picture got a lot of likes on my facebook page and it was really the easiest experiment to do. You need two things: red or pink play dough and a bowl. First you get a small bowl. The larger the bowl the more brains you will have to make. Maybe you want to be ambitious and use a bowl that will fit your child's head, go you! Next, Cover the bowl with the play dough since some of it will show through. Then, roll the remainder play dough into snakes. It doesn't matter how long your snakes are. You will need a variety of sizes but they all should be about the same thickness. Start by bending the snakes into S shapes. Take a look at the pictures to get a general idea. There is no wrong way here. The hardest part is getting the snakes to stick well enough on the bowl. If you wanted to, you could try gluing them. It took days for mine to harden and then pieces would fall apart. I wasn't really expecting it to last too long so it was not a big deal to me. If you want to keep yours, maybe try modge podge glue over the whole thing when you finish. If you have a suggestion that worked for you and want to share with others, leave it in the comment section below.
Here is the link I used for the idea though I simplified it. The brain was originally listed as a Halloween decoration! Double uses here people!
Here is a link for DIY play dough but since cream of tartar costs just as much as buying ready made play dough, it may not save you money if you are only making one. I think one can of play dough per brain should be enough if the brain is not too big. Also, there are tons of different recipe ideas if you want to make things like Chocolate or cotton candy play dough.
Here is another activity we did for the brain.

I drew an outline of the brain myself and then sectioned it off. It may be easier to print it out. Use card stock if you want to use play dough. Otherwise you can just color it in. Here are some additional ideas that go along with learning about the brain.
Lets see, what else did I promise from last week... Oh yeah, lungs!

Here is the link I followed from Pinterest.
This lung experiment took more planning than I wanted but still it was easy enough. I took a video of it to show people on my phone when they ask about home schooling. Yeah, I'm bragging to them but now you can do the same thing! Aside from the .75 fake sprite I bought, (my kids were in Heaven or maybe just a sugar high) it was made with things I had around the house. Yes, I do keep balloons around my house. I actually have a kid that I babysit who looks forward to getting balloons at Sis. P's house. I'm like the cool aunt! Make sure you use non bendable straws. I didn't cut two holes in the lid of the bottle as the directions from the site said- too hard. Instead I put tape around the straws nice and snug. I used rubber bands to secure the balloons to the end of the straw. The directions also said to use a big balloon for the bottom of the bottle. You know, the kind with the rubber band attached that you bang back and fourth trying to annoy your brother with? I didn't have one on hand, though you can get them 3 for a dollar at the 99 cent store, so I used a plastic grocery store bag. Anyone else have a bag filled with other bags living under their kitchen sink? I put a rubber band around the bag to hold it tight as well. Then just blow into the straws and you have lungs! Perfect unexpected side effect: one balloon often would get bigger than the other. Did you know the left lung is smaller to make room for your heart? We always made sure the smaller one was on the left by turning the bottle upside down if we had to. Coincidentally I drew the left lung smaller on my human body chart by accident. Bonus!

The digestive system surely has more experiments to choose from. I wasn't too thrilled with the outcome of this one, though I do think it teaches the topic very well and lots of websites have this experiment listed when teaching this concept. Here is a link that shows something like what I did.


I got a gallon sized Ziploc bag and filled it half way with water. I think vinegar and a little green food coloring might have been better to show that our tummy is full of stinky (but totally helpful) acid and in my imagination that acid is green (resist the erg to google it). I used an empty paper towel roll as the esophagus and as you can see in the picture above J put it slightly in the bag without getting it wet. Then we fed it bread. Something more colorful like cheese may have been more visually stimulating.
After that J used her hands to act as the muscles in our stomachs to break the food down ready to enter the intestines. We learned about the intestines on a different day though it could go along with learning about the stomach since it all makes up the digestive system. This day, however, was focused on the stomach and what goes on there.
Since I'm not super enthusiastic about this one I'm giving you a bonus link that looks very nifty to try. Give THIS life size looking digestive maze of awesomeness a go.

You can always make a Tee Shirt. It seems a bit strange, but it's sure to be a great conversation piece at any home school function. It would also be great reinforcement if you challenged the kids to tell about the digestive path anytime someone asked about the shirt. I can't even look at this shirt without laughing. I'd love to see a picture of one of my readers wearing their original digestive system shirt! You would totally rock in my book.

I'm going to end my Human Body Series with the nervous system. This was SO simple and really neat, even for me. By now I hope you have partaken of the awesome sensation of going back and fourth between a hot tub and a swimming pool. It really stuns the nerves system. That is this experiment on a giant level. We want to make it portable and able to fit on your table top. You start with 3 bowls. In bowl 1: Ice water. Bowl 2: room temperature water. Bowl 3: hot water of the non flesh burning variety. Have the student place one hand in the ice water and the other in the hot water. Keep submerged for 1 minute (3 if they have been bad that day ;-). Then place both hands in the lukewarm water. The hand that was in the ice is now very warm while the hand that was in the hot is now chilled. Easy! By the way, if you are following along on your Human Body Chart from Part 1, we colored in skin for this experiment.

Ok, so I couldn't find the link where I got this idea but It's simple enough to follow the steps above I hope. And I'm also giving you THIS link for an optional idea to choose from.

The human body is amazing! I didn't cover every topic we learned in our semester at home, or that is listed on the human body chart I made, but I have faith that you can come up with some one your own. Also, there is no rule that says each topic must have an exciting hands on experiment. If you comment with your email address I have an overwhelming list of resources I can send to you on the human body. I really think that this semester could be done inexpensively. To conclude this topic for now, I'll leave you with some books I kept on hand. If you have suggestions- post them in the comments below.
Thanks for reading!


The October Unit Factory
I love seasons and holidays. I love them so much it’s difficult to not get caught up in them to the point of neglecting other things. Always on the lookout for ways to have my cake and eat it, too, I’ve got lists of ideas for “festive schooling.” These range from the obvious and more traditional to the sometimes wild and crazy.
Below is a list of a few unit suggestions for the month of October. The beauty of units is that they can last a day, a week... even a lifetime. So whether you’re looking for something for the entire month, or just a way to pass the daylight on October 31, have a look and see what strikes your fancy.
The really fun thing about learning is seeing how all things connect. Many of the suggestions are smaller or larger parts of each other. You can isolate certain aspects, or tackle it all together. Some of the ideas will have suggested activities or websites. These are just the tip of the iceberg. Resources and possibilities are endless!
The Night – October is a good month to study a different aspect of nighttime each day. This can include nocturnal animals, nighttime occupations, bedtime (rituals, dreams...), night festivals, the sky at night (moon, constellations, Earth’s rotation...), and its opposite – light (Daylight Savings Time, fire, candles, electricity...). I recommend reading The Complete Book of the Night, by Sally Tagholm.
The Skeletal System – Get started at here.
Bats, Cats, Owls and Fowls – This web page and this web page have some free and easy access information, worksheets, crafts, and activities. Just type your topic into the internal search engines.
Fantasy and Fiction – Now is a perfect time to learn about and decide what is real and what isn’t.
Costuming – Learn about fashion through the ages, how to sew a costume, or see how imaginative you can get in creating a costume.
Mystery – Study some of the greats: read Agatha Christie or some of Sherlock Holmes’ adventures. Find out what makes a great mystery and try writing your own.
Times and Seasons – Kind of a “duh,” but expand on it. If you like nature walks and journals, relish them in October! Sketch the same tree every day, detailing the differences after time and wind and weather. Chart sunrise and sunset. Learn about the history of Daylight Savings Time. See if the Farmer’s Almanac is correct in its predictions. (By the way, Ben Franklin had something to do with Daylight Savings, almanacs, electricity, wood stoves to keep warm, and more! You could learn about him and cover several things at once!) Learn leaf and tree identification. Take up photography during this beautifully colorful season, either by taking a professional class, or by handing your kids disposable cameras for documenting the signs of autumn in a book of their own. I recommend reading Look What I Did with a Leaf! By Morteza E. Sohi.
Edgar Allan Poe – If you like dark, gloomy and horrifying, this is your man. There’s nothing uplifting about his work, and yet his writing, for some, is magnetic. Definitely considered a classic author and poet, I’m not sure his tales are for everyone. Still, if you’re interested, go here.
Frankenstein – While Mary Shelley’s famous novel about a monster is usually classified a “horror story,” it is much, much more. It is poignant, provoking and a masterful look at ethics, behavior, identity, and love. If you have older youth, it could spark a great discussion on morality and be compared to many of today’s current events. Frankenstein is said to be the very first science fiction novel, and Shelley wrote it when just 18 years old!
The Celts – A large part of the Halloween “story”, the Celts themselves are a fascinating people. Good places to start learning about them: here and here.
Fear - You'll likely recall Franklin D. Roosevelt's famous words, "...the only thing we have to fear is fear itself." Profound to those mature enough to understand and agree with it, it's a statement children may find ridiculous. All creatures fear what they don't know or understand. October is a perfect time to teach how many of our fears rise from ignorance. Knowledge is power!
As a family, study something that seems scary. Demonstrate how to properly research a topic, summarize information, transfer the new knowledge into a "show and tell" project or paper with proper documentation. Then allow each child to choose their own object of fear and follow the same steps on their own (or with a little guidance depending on age). Some suggestions would include snakes, thunderstorms, spiders, and the dark.
You could also learn about the physical responses to fear. Learn about adrenaline, how it affects us, why some people actually like to be scared, and maybe even discuss “highs” and drug addiction. Discuss safety and prevention (Fire Prevention Week is in October!). Talk about “fight or flight.” Maybe even learn a little self-defense.
I recommend reading What Was I Scared Of? by Dr. Seuss.
Sounds of October – This time of year the stores have many recordings of scary sound effects. If you like, make your own recordings of sounds. It can be great fun for each child to individually make their own tape and then play it for their siblings to have them guess what the sounds are. It takes ingenuity to create sounds for thunder or wind with nothing but what’s in the house.
Great October music includes:
Vivaldi’s “Four Seasons” – Does the music match the seasons?
“Danse Macabre” by Camille Saint-Saens
“Night on Bald Mountain” by M. Mussorgsky
“In the Hall of the Mountain King” from “Peer Gynt” Suite by Edvard Grieg
“Toccata & Fugue in D Minor” by Johann Sebastian Bach
“Linus and Lucy” The Music of Vince Guaraldi played by George Winston
“Maple Leaf Rag” by Scott Joplin
“The Ride of the Valkryies” by Wagner
Tastes of the Season – Go to a local Farmer’s Market and purchase one of every apple variety you can find. Do taste tests and compare flavors. Poll your family, friends and neighbors as to their favorite type and make a graph of apple favorites. Learn how new varieties of apples are created. Experiment with making applesauce. Do mixing varieties give better flavor? What about adding cinnamon candies or vanilla extract? What texture is best? Do you prefer it a little crispy, or as complete mush? Do you like it better served cold, or warm from the stove?
Pumpkins lend themselves to all sorts of mathematical activities, including estimation, measuring circumference and weight.
Don’t forget the Halloween candy! From simply counting the objects to naming and sorting according to shape, the trick-or-treat bag is a bag full of math tricks. Fraction fun (What fraction of your treats are candy bars, what fraction of your candy bars contain nuts, what fraction of your candy was made by Hershey?) patterns, tangible Venn diagrams, graphs, greater than/less than calorie counts and so on.
Halloween History - Regardless of how you personally feel about Halloween and all that seems to go with it, it’s a good idea to learn about its history and origins. In doing so as a family, you can compare old customs and beliefs with what we know and do today, and more importantly with what you believe and want to foster in your children. Dispelling ancient myths and superstitions, discovering hidden truths, understanding the value of science, knowledge, enlightenment and testimony- these things can enrich your homeschool. Halloween isn’t just about devils and demons. It’s about harvests, new beginnings, loved ones, and eternal life. Check it out and see what you think!
For basic information check out these four web sites:
For teaching ideas, worksheets, crafts, activities, unit plans, etc. go to these two web sites:
Batty About Bats
One of the reasons that fall is my favorite time of year is because it provides so many cool topics to learn about. This year, as my family has been looking forward to Halloween, we’ve been studying up on bats. As always when I plan a unit study, the library is my first stop. Some of our favorite bat titles included:
1. Zipping, Zapping, Zooming Bats by Ann Earle (Let’s Read and Find Out Science series)
2. National Geographic Kids Bats! by Elizabeth Carney
3. I am a Little Bat by Marta Prims
4. Stellaluna by Janell Cannon
5. The Magic School Bus Going Batty: A Book About Bats by Joanna Cole

All About Bats
After reading our books, we did a bat fact sorting activity. I printed out a list of statements about bats, some of them true and some of them false. The kids cut out each statement and determined whether it was a fact or a myth, and glued it under the correct heading.

From-phone-9-28-13-880
Then we did an activity to teach the kids about how echolocation works. I cut a piece of large poster board in half and made two large cones that looked like megaphones. I had two kids stand about six feet apart facing a wall, but kind of angled towards each other, so that the two kids and the wall were making a V, and gave each a megaphone. The first kid pointed his megaphone towards the wall and whispered semi-loudly into his megaphone. The second kid pointed his megaphone towards the wall, and put his ear up to the megaphone. The idea is that the sound will bounce off the wall and back into the second megaphone. You can hear the whisper really loudly. It's cool. And the kids loved it.

My-Photo-Stream99

From-phone-9-28-13-914
Of course I had to throw an art project in the mix. You can’t have a proper unit study without an art project. First I gave each of the kids a black piece of construction paper, and a few bat cut-outs. They decided where they wanted the bats to be, and I helped tape them in place (use masking tape so it won’t rip the black behind when pulling the bats off later). Then we got out our sponges and our paints and went to town, making sure we sponged all around the edges of the bats. When we were done we pulled the bats off. To finish it up, I made a nice outline around each of the bats with permanent marker.
Because I wanted to practice some handwriting, I had each kid write down three things they learned about bats during our unit, and I incorporated it into the art project by gluing the painted bats and the fact sheets onto a large piece of construction paper. Then we taped them up on a closet door where they will remain as part of the Halloween decor until the end of October.
Learning With Traditions

4th-of-July-024
One of our family’s favorite Fourth of July traditions is to get up SUPER early, and drive to a nearby town to watch a hot air balloon launch. They spread out the balloons on a large grassy area, while spectators pile in, filling up the spaces in between. It’s cool because you can get right up close and see all the action. My kids love it.
This year, (being the obsessive unit-study guru that I sometimes am) I decided to put together some activities for the kids, to get us all prepared for our big day.

ballooncollage
First we headed to the library, and checked out a few books on hot air balloons. Our favorites were The Big Balloon Race by Eleanor Coerr, The Amazing Air Balloon by Jean Van Leeuwen, and Hot Air: The (mostly) True Story of the First Balloon Ride by Marjorie Priceman. In these books we learned some great vocabulary words, a little bit about how hot air balloons work, and some cool historical facts.
We made sun-catchers; a simple craft, but one that is always a big hit because it’s doable for kids of all ages. We usually do these in the fall, with apples or pumpkins, but this craft is easily adaptable to whatever your needs are. This time we made hot air balloon sun-catchers.

ballonsuncatchers2
- Find a black and white template of a hot air balloon that you like. Doing a Google search for “hot air balloon template” will give you some good options. Print it on card stock.
- Use a thick black magic marker to make the outlines about half an inch thick.
- Cut out around the outside and inside of your template, so that all you’re left with is the black out line.
- Place the outline, black side down, onto a piece of clear contact paper. (You can find contact paper at WalMart in the kitchen section by the shelving paper.)
- Use colored tissue paper of your choice, rip it into small pieces, and press it down onto the contact paper to fill in the clear spots of your template. It’s ok if the tissue paper pieces overlap each other.
- Take a second piece of contact paper and press it down on top of the tissue paper layer. Then use scissors to cut out the outside edge of your template.
- Hang your template up in the window where lots of sun can shine through.


My husband got into it too, and helped the kids construct a mini hot air balloon out of trash bags, tape, string, and a plastic cup. He used a hair dryer to inflate it, and taught the kids about how hot air rises and that’s why balloons go up.
Over all, I’d say the unit was a success. The kids had a good time, and maybe even learned a little bit too. It made our hot air balloon launch tradition all the more exciting.
Moon Mania
The kids and I have been loving a new science series called “Let’s Read and Find Out Science”. The series covers all kinds of science topics; weather, space, animals, human body, dinosaurs, physics concepts, and more. They are so fun! So far, I am thoroughly impressed with how much information they provide in a simple way for kids to understand. Most every book comes with some sort of experiment, or further learning activity that you can do at home with things you already have. It’s genius! And I feel like I learn a lot too.

moon-is-like

moon-surface

the-moon-seems-to-change
We’ve been on a space kick lately…more specifically a moon kick. We’ve used two of the Let’s Read and Find Out books for our study. The first book is called What the Moon is Like. It taught us about how the surface of the moon is covered in dust, and how meteors hit the moon to make big craters. Then we filled a Tupperware container with two inches of flour and sprinkled it with a thin layer of cocoa powder, to represent the moon’s surface. Next we took marbles and dropped them into the container from about five inches up. The marble hitting the flour is supposed to look similar to a meteor hitting the surface of the moon. I've never seen a meteor hit the moon, but our marbles definitely made craters in our flour. It was fun.

2

3

1
The second book we used was called The Moon Seems to Change. It taught us all about the phases of the moon. Inside it gives you the step by step directions (with pictures!) on how to make all the phases of the moon using an orange, a pencil, and a flashlight. We took turns being the sun (person holding the flashlight) and the earth (person holding the orange). After that, we had a little snack to go along with our lesson. We did phases of the moon a second time, using Oreo cookies. I had a rough go of it, trying to keep our moons from being gobbled up before I could snap a picture. :)
My kids enjoyed these activities. I can tell because while I was putting the boys to bed, my five-year-old told me he wanted to set his watch for 12:00am so he could get up and check on the moon, to see which phase it was in. I love it! We'll see if he follows through. I hope he does.